Read a spreadsheet and send html emails with python
This article assumes you know some programming. Python is an easy language to pick up, but if you’ve never written in python, I suggest you get it installed and learn how to set up a virtual environment prior to reading this.
Download python here
check out this virtual environment article here
Goal #1
: Send an html email using a built in library from python called “smtplib” (simple-mail-transfer-protocol–SMTP).
Goal #2
: We’ll send multiple emails with dynamically filled data by importing information from an excel file. (cool, dude)
Estimated time
: 30 minutes to 1 hour, depending on experience.
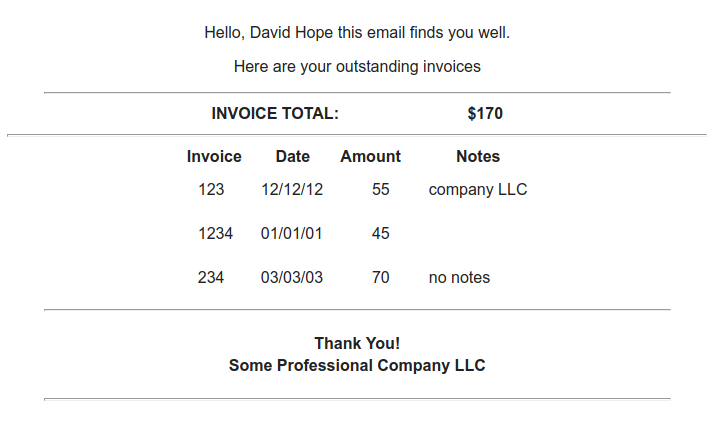
We’ll build a simple but professional looking invoice that will look like this:
We’re going to use gmail.
prior to sending our first email, we’ll need to go into gmail account settings and allow less secure apps. I’d also make sure you have 2 factor authentication setup. Lastly, you’ll want to tell gmail that your ‘app’ is going to access your account. You’ll get an ‘app password’ and we’ll use that as part of an authentication process that our script will use to login and send emails.
Want more detailed instructions?
How to allow your apps to access gmail
Setup an app password
Python files are save with the .py extension and must be valid (–no dashes–)… I’d call mine something like send_email.py
Step one
: import smtplib and send a simple email
import smtplib

from email.mime.text import MIMEText

gmail_user = "youremail@gmail.com"
gmail_appPassword = "<app password from gmail>"

sent_from = ['youremail@gmail.com']
to = ['probablyYourselfForNow@gmail.com']

text = 'you owe me a million dollars, bro'

msg = MIMEText(text)

server = smtplib.SMTP_SSL('smtp.gmail.com', 465)
server.login(gmail_user, gmail_appPassword)
server.sendmail(sent_from, to, msg.as_string())
server.quit()
Great Job!
It’s pretty easy to send emails using python and the library smtplib. There are other 3rd party libraries that allow you to do the same thing. It’s important to note that we’re using “smtplib.SMTP_SSL()”. Originally I was skeptical of the safety of displaying a password and username in a script being sent on-line. The SSL establishes an encrypted line of communication between your computer and server and since that’s established first, the sensitive information is encrypted. Your script is never sent as plain text when using SSL. Additionally we used an app password.
Now let’s continue…
Since we’re already sending emails, let’s shift our focus to reading an excel spreadsheet and populate a plain text email with the data from the spreadsheet.
First let’s get the library openpxyl.
inside your virtual environment, enter this code:
pip install openpyxlNow let’s add this library to our script.py:
from openpyxl import load_workbookThinking Like A Programmer
There are many ways to accomplish a task when programming. It helps to have an idea of the kind of the data we are getting, and how it’s being stored. Since our data is coming from a spreadsheet, it makes a lot of sense to store our data either by rows or columns. Take a look at how I designed my spreadsheet:

we’re going to be grabbing our data by row. The first row is an example of a simple email with one invoice, while the second row shows how you might do a more complex invoice.
Take a look at this code. I’ve commented extensively to allow the code and library to explain itself:
def get_invoice():

#set a variable to the file path of our spreadsheet#
    excelfile = 'simple_excelmail.xlsx'
#use the imported load_workbook() function to retrieve the spreadsheet#
    wb = load_workbook(excelfile)
#since we have the ability to store multiple spreadsheets in a single workbook, we’re setting up a #variable to access our first and only spreadsheet#
    ws = wb[wb.sheetnames[0]]

    invoice = []

    for row in ws.iter_rows(row_offset=1):
        for cell in row:
            #print(cell.value)#uncomment this line to see each cell’s data
            invoice.append(str(cell.value))

    return invoice

print(get_invoice())
It’s always a good idea to look at the docs. I spent some time in them in order to learn how to iterate over the data. Conveniently enough they have a function for us called ‘iter_rows()’ which allows us to extract data per row—so convenient! Additionally, I’ve added an offset variable to our iteration of rows, allowing us to skip the header of all the rows. Again, how convenient is that?!
I commented out the smtplib portion of my script for now and it will remain that way till we get to the end.
If you run the script, you’ll see it print out an array or list that should contain the data extracted from our spreadsheet. Cool!
Now, all we need is to populate our plain text with some of that data…
data = get_invoice()

text = "{0} owes me {1} dollars, bro".format(data[0], data[3])

print(text)#output: "Dave owes me 500 dollars, bro"
Let’s run our script to make sure that we are 1) pulling our data from excel, 2) able to store it in a list that we can access, 3) and we’re populating a string with dynamic information. You should see the script print a string with our information from excel.
Well done. You might have noticed that if you have more than one row in your spreadhseet, it’s also pulling in that information. That’s great, we’ll use that later to send multiple emails everytime we run the script.
Interested in adding the html part?
Email Tips and Tricks
Html emails are a bit tricky and I highly recommend you google some tips and tricks to writing html emails that are clean and consistent. I follow the advice of others when I use tables in my html layout. I suggest you do the same. The code isn’t pretty, it’s ugly and harder to read, but this will work across all the email clients I’ve tested (hotmail, gmail, yahoo, outlook). It’s also necessary to write css inline (curse you email world!!!). Another trick to use–set your max width to no larger than 600px.
I’m not concerned with teaching you html or css in this tutorial so I’m not going to explain much about what I’ve done. As a general hint to understanding the code, look for table rows (tr) and table headers (th), and those should give you an idea of how this html is laid out.
Let’s create a function that will build the html portions of our email. This function will be useful when we’re sending multiple emails:
def build_email():

    html = """\
    <!DOCTYPE html>
    <html>
        <body>
            <p style="text-align: center"> Hello, #name variable# Hope this email finds you well.</p>

            <p style="text-align: center">Here are your outstanding invoices</p>
            <hr style="width: 500px;">
            <table style="margin-left: auto; margin-right: auto">
                <tr>
                    <th>INVOICE TOTAL:</th>
                    <th style="padding-left: 100px">$#total variable#</th>
                </tr>
            </table>
            <hr class="width">

            <table style="margin-left: auto; margin-right: auto">
                <tr class="left padded">
                    <th style="text-align: left;"> Invoice </th>
                    <th> Date </th>
                    <th style="text-align: right;"> Amount </th>
                    <th style="padding-left: 20px;"> Notes </th>
                </tr>
                #<here we will add a template>#
            </table>

            <hr style="width: 500px;">
                <table style="margin-left: auto; margin-right: auto; padding: 10px;">
                    <tr>
                        <th> Thank You! </th>
                    </tr>
                    <tr>
                        <th> My Professional Coding Company LLC </th>
                    </tr>
                </table>
            <hr style="width: 500px;">

        </body>
    </html>
    """
We’re also going to need to change the type of message we’re sending. Instead of
msg = MIMEText(text)change our msg to
msg = MIMEMultipart('alternative')Add it to the top our document as well like so:
from email.mime.multipart import MIMEMultipartAnd let’s keep our variable “text” as something to fall back on in case our html can’t be displayed.
We have two content portions to our email. One with html, another with plain text. let’s have our code reflect that and attach those 2 different portions to our “msg”.
part1 = MIMEText(text, 'plain')
part2 = MIMEText(html, 'html')


msg.attach(part1)
msg.attach(part2)
Great!
We need to be able to dynamically add table rows to this html, in case someone has multiple invoices (take a look at the excel screenshot above as a reference). And we want to send multiple emails– this is a job for a constructor function. In python we do this utilizing the “init” portion of a function. Inside of our “build_email()” function, let’s add a call to another function where we will build the template. Let’s also add a “to” variable, creating a list of emails to send to:
def build_email(data):
    new_template = Invoice(data[0], data[1], data[2], data[3], data[4])
    to = data[5].split(",")
Above the “build_email(data)” let’s put our Invoice function with an init portion inside, like so:
# Invoice is Constructor for template to be added to larger html later
class Invoice:

    def __init__(self, name, invoice_num, date, amount, notes, email):
        self.name = name
        self.invoice_num = invoice_num.split(",")
        self.date = date.split(",")
        self.amount = amount.split(",")
        self.notes = notes.split(",")
        self.total = 0
Before we move on, let’s make sure we’re on the same page. We’re building a function so that we can send an html email with multiple rows, where each row contains an invoice number, an amount, a date, and any notes. This will be reflected in our spreadsheet by separating each invoice number with a comma. The invoice numbers should correlate to the amount, also separated with commas, etc. Check out how my spreadsheet looks above for clarification.
Looking at the init portion of the code we can see that we’re creating additional lists for our invoice numbers, dates, amounts, and notes.
Now, all we need is to setup a template and iterate over the values in our lists, inserting them into the template, which we will then insert into a list of templates… let me show you how I did this inside of the Invoice constructor function.
self.template_array = []

#        sum amounts for total
        for i in range(0, len(self.invoice_num)):
            self.total += int(self.amount[i])

            template = """
                <tr class="left">
                    <td style="padding: 10px; text-align: left;">"""+ self.invoice_num[i] +"""</td>
                    <td style="padding: 10px;">""" + self.date[i] + """</td>
                    <td style="text-align: right; padding: 10px;">"""+ self.amount[i] +"""</td>
                    <td style="padding-left: 20px;">"""+ self.notes[i] +"""</td>
                    </tr>
                """
            self.template_array.append(template)
        self.total = str(self.total)
Pretty easy, right? Your whole Invoice function should look like this:
class Invoice:

    def __init__(self, name, invoice_num, date, amount, notes):
        self.name = name
        self.invoice_num = invoice_num.split(",")
        self.date = date.split(",")
        self.amount = amount.split(",")
        self.notes = notes.split(",")
        self.total = 0

        self.template_array = []
#        print(self.notes[0], self.invoice_num, self.to)

#        sum amounts for total
        for i in range(0, len(self.invoice_num)):
            self.total += int(self.amount[i])

            template = """
                <tr class="left">
                    <td style="padding: 10px; text-align: left;">"""+ self.invoice_num[i] +"""</td>
                    <td style="padding: 10px;">""" + self.date[i] + """</td>
                    <td style="text-align: right; padding: 10px;">"""+ self.amount[i] +"""</td>
                    <td style="padding-left: 20px;">"""+ self.notes[i] +"""</td>
                    </tr>
                """
            self.template_array.append(template)
        self.total = str(self.total)
Now what? Well, we have a constructor function which we are calling in our build_email() function, giving us a list of templated html rows. All we really have to do is insert these templates into our larger html code.
Your “html” variable should now look something like this:
html = """\
    <!DOCTYPE html>
    <html>
        <body>
            <p style="text-align: center"> Hello, """+ new_template.name +""" Hope this email finds you well.</p>

            <p style="text-align: center">Here are your outstanding invoices</p>
            <hr style="width: 500px;">
            <table style="margin-left: auto; margin-right: auto">
                <tr>
                    <th>INVOICE TOTAL:</th>
                    <th style="padding-left: 100px">$"""+ new_template.total +"""</th>
                </tr>
            </table>
            <hr class="width">

            <table style="margin-left: auto; margin-right: auto">
                <tr class="left padded">
                    <th style="text-align: left;"> Invoice </th>
                    <th> Date </th>
                    <th style="text-align: right;"> Amount </th>
                    <th style="padding-left: 20px;"> Notes </th>
                </tr>
                """ + ''.join(new_template.template_array) + """
            </table>

            <hr style="width: 500px;">
                <table style="margin-left: auto; margin-right: auto; padding: 10px;">
                    <tr>
                        <th> Thank You! </th>
                    </tr>
                    <tr>
                        <th> My Professional LLC </th>
                    </tr>
                </table>
            <hr style="width: 500px;">

        </body>
    </html>
    """
you can see that we dismantled our list of templates with this line of code:
''.join(new_template.template_array)If we were to look at our code for our templates it would appear as a big string. That’s exactly what we wanted. We are very close to sending a batch of html emails to different people, with multiple invoices.
The Final Step
Let’s build one last function called send_email(). In it we’ll put a “try” where we can copy and paste our smtplib code we wrote at the beginning. We’ll add an except… And lastly, we’ll take our data and remove the portions we’ve already used for our current email, calling our build_email() once again to start the process for any additional data we’ve pulled from rows in our spreadsheet. We also need to call our send_email() with a few parameters from our build_email() function.
Sooooo… at the end of our build_email() let’s add:
send_email(to, msg, new_template)And let’s take a look at the send_email() code:
def send_email(to, msg, new_template):

    data.reverse()

    for i in range(0, 6):
        data.pop()

    try:
        data.reverse()
        server = smtplib.SMTP_SSL('smtp.gmail.com', 465)
        server.login(gmail_user, gmail_pword)
        server.sendmail(sent_from, to, msg.as_string())

        print("Email Sent To: ", new_template.name)
        print("@: ", to)
        print("Invoice Numbers: ", new_template.invoice_num)
        print("TOTAL: ", new_template.total, "---------------------------")
        server.quit()

        #spreadsheet pulls an extra row full of ‘None’ and throws the except#
        if(data[0] == 'None'):
            print('END OF LIST')
        else:
            build_email(data)
    except Exception as e:
        print(e)
        print('Email Failed to Send to: ', new_template.name)
        print("@: ", to)
        print("Invoice Numbers: ", new_template.invoice_num)
data = list_invoices()
#print(data)
You can see that I’ve added in print statements as a way of monitoring sent emails. I find it reassuring/satisfying to see.
And that is it. You’ve done it. You now have a really nice, professional-looking html email that you are sending based off a simple excel spreadsheet. The ability to read excel spreadsheets means we can number crunch like a true python fan loves to do. We can use this skill in finance, science, stats and more.
Click here to see the full code on Github
If you’re looking for a similar article that introduces you to the concept of dictionaries in python, check out this twilio article fair warning: there are some errors in the twilio article’s code, but the github code works and can be referenced.
Additionally, here is a link to more tutorials using spreadsheets combined with various python libraries (we used openpyxl above). Explore, code, create. And good luck!